Treat Packaging & A Garland With the Swoon Color Story
Hello, everyone and welcome to the weekend! I hope it's not too icy or snowy or cold wherever you are this lovely February day. I wanted to pop in with a couple of last-minute Valentine's Day ideas to brighten your Friday morning. I have a couple of treat packages as well as a garland that I've had adorning the banister in my foyer for the past couple of weeks. There's less to explain with the garland, so let's take a quick look at that.

I used the Swoon Color Story to put this beauty together. I love all the warm pinks and red with a pop of aqua blue! I used the Linked Garland die to cut the strips and then just spent a couple of evenings putting it together while relaxing on the couch with my fella. This garland consists of one pass of each of the five colors (or a total of 35 rings). It's a great, low stress activity and I love how much cheer it brings to the space. I'm looking forward to other holidays I can use as an excuse to make more of these garlands!
But I love the Swoon Color Story way too much to stop there, so I kept creating! These mug treat cups came next.
![]()
I love the 3D mug in the Homespun Holiday: Cozy Cocoa kit, I really do. They're so cute and charming as ornaments, but I wanted to make them into functional vessels too! They're a great size and there is so much you can do to decorate the sides. Let's get a closer look at each of these.

The Cardinal mug says "I *heart* you" spelled out with the Monogram and Inline Monogram Alphabets as well as a couple of little pieces you might have actually thrown in the trash (if you aren't a hoarder like me...or my daughter who has claimed all of my little negatives and scraps as her own). The heart is pieced together with the negatives from the handle of the flat mug!

I stitched on the letters (cut from Petal felt), leaving a space for the heart.

Then, I cheated a little and used hot glue to add the heart halves (cut from Rouge), but then embellished a bit with a sequin and bead. You could certainly stitch these into place, but I was looking for a quick option. You could also have the two halves be different colors. How cute!
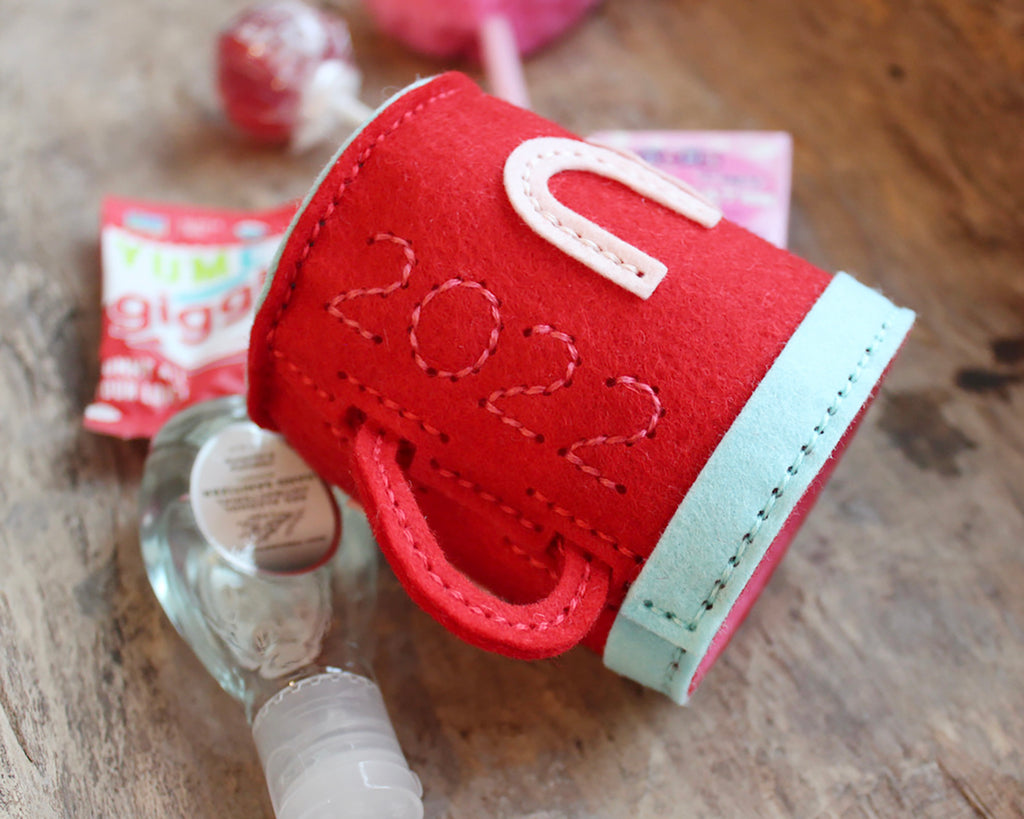
I also wanted to add the date to these mugs, so I used the Keepsake Dates Die to include the "2022" right next to the handle.

And I thought I would personalize it further by adding a monogram to the bottom (cut from Poolside). I used the Inline Monogram Alphabet by itself to keep the base of the mug smooth and stable. Another way I kept the bottoms of these mugs stable was to cut two layers of felt for the bottoms and insert a chipboard circle between them while stitching everything up. Not a totally necessary step, but it does keep things nice and sturdy.

All that stitching on the walls of the mug meant a fair number of threads on the inside, so I created a lining to hide all of the less pretty bits. I used my trusty hot glue gun again to secure it to the inside of my mug. If you're interested in doing these, I believe the dimensions were around 3 1/8" x 7 7/8". It just makes the inside look as clean and polished as the outside. You could even use less expensive felt for this step if you're concerned about preserving your good stuff for more visible areas (which I totally understand).

I couldn't leave out my girl, so this one is for her. I got a little girly with it, but she's been declaring all colors pink lately, so I don't think she'll mind.

I used the Keepsake Ornaments Extras die to create a window in the front of her Paloma mug. I used Tundra (not included in the Swoon Color Story) to back the window, but all of the other colors are from Swoon. The T is cut from Petal (as is the contrasting band and the bottom pieces).

I added these tiny rolled rosettes using Rouge felt. The leaves are from Petal felt. Once I had hot glued them into place, I embellished with some of the beads from the Color Story bead kit.

These pieces are actually negatives as well! The smaller rosettes are the inside of the letter "O" from the Monogram Alphabet and the larger one is part of the center of one of the Keepsake Ornaments Extras windows (I didn't use it all the way to the scalloped edge).

The leaves are more of the negatives from the mug handle. I just trimmed the excess to create different sizes.

I added the date to this mug too, using the same Keepsake Dates Die.

I love that Tilly will be able to look at all of the projects I'll make her through the years and see when they were created.

And, once again, I lined the inside with a solid piece of felt. I'm glad that she won't be able to get to any of the loose threads since they're all nice and secure behind the lining.
Well, that's all I have to share with you today. I hope you've enjoyed getting a little inspiration with the Swoon Color Story. I'm really looking forward to giving these to my people on the big day! Have a safe and crafty weekend, everyone!
I love these! I will be making some myself tomorrow! Thanks so much for the tips. I especially love knowing that hot glue can be used as a cheat from time to time.