It's Release Day!
Good morning, everyone, and welcome to release day! I am excited to share another set of snow globe ornaments with you, but first we have some very important business to attend to - we have winners to announce!

We have one randomly selected winner from each day of introductions.
On Day 1 I asked "Do you have family memories that influence the color palettes you use to decorate for holidays?"
Linda Edwards said:

She will win a $50 gift certificate to our store!
On Day 2 I asked "What is your favorite seasonal green to decorate with at the holidays? Do you prefer poinsettias? Holly? Mistletoe?"
Sallie C said:

She will win a $50 gift certificate to our store!
On Day 3 I asked "Do you love snow or could you do without it?"
Donna said:

She will win a $50 gift certificate to our store!
And on Day 4 I asked "What is your favorite snowy weather activity?"
Our Grand Prize winner is Denise Evans and she said:

She will win a $150 gift certificate to our store!
Congratulations to all of you and many thanks to everyone for playing along! Please contact Customer Service (customerservice@poshtadesign.com) within 30 days to claim your prize.
The release will go live today at Noon ET, but I thought we could all use one last bit of inspiration before the launch.

I really wanted to use the Christmas Cheer Color Story to create a set of ornaments using the new Homespun Holiday: Scenic Snow Globes Kit. I love the bright and youthful colors!

My first ornament features the "Let it Snow" greeting from the Snow Globe Messages Die. I used Pixie felt for the background. The base of the ornament is Glacier and I used teal thread to stitch the sentiment. I dotted the "i" with a bead (you could also use a French knot) and embellished with snowflake sequins.

I only wanted to decorate the front of this ornament (because conserving felt is totally reasonable) so I chose to leave the back plain. There are stitching holes for the base of the snow globe, so rather than cut a second base or leaving them open, I simply stitched through those holes with matching thread. Easy!

My second ornament is Tilly's for this year. On the front I created a little scene with the house and trees. I cut a second house from Tundra and trimmed off the roof to create a bit of a snow-capped look on the Pixie house. I also beaded each stitch along the roof line to look like a string of twinkle lights. I added the date to the snow globe base so she'll know when Mama made this ornament.

On the back, I used the Keepsake Ornaments Extras Die to cut a window to feature a monogram. The looped design on the base adds another playful element to this snow globe.

The last of the ornaments today is one I made for myself. This little snowman makes me smile, so I've claimed him for my very own. I paired my snowman with the "Joy" greeting from Snow Globe Messages and then sewed on a sprinkling of snowflake sequins.
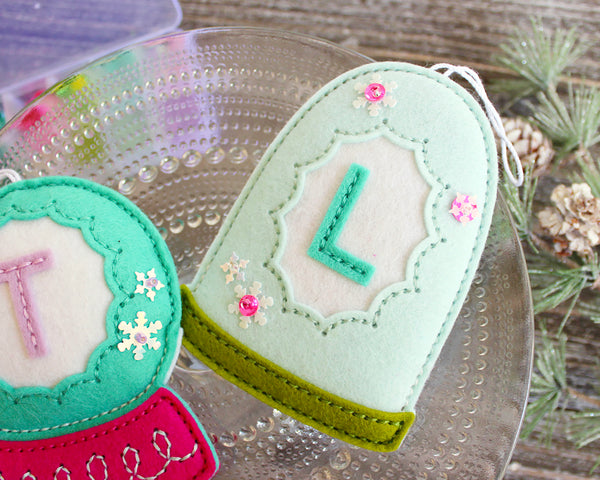
On the back I used the oval window from the Keepsake Ornaments Extras Die to cut the opening and layer for my monogram. I sprinkled sequins around the frame, even layering some of them with bright pink sequins. I'm so into this look! I'm definitely going to do it again.

Thank you so much for joining me this week. It's been a lot of fun to share these new designs with you and I can't wait to see how you will use them to build special holiday memories of your own! The release is today 10/7 at Noon ET so set your clocks. Happy crafting and I'll see you again soon!
Love these pretty creations! Congrats to the winners!
Congratulations to the winners!! These ornaments are so cute :)
Thank you for all the amazing inspiration!
@Kim Burckhard I’m so sorry, Kim! It’s $160.
So stinkum CUTE! Can’t wait to get my hands on some of these goodies.