Introducing The Homespun Holiday: Gingerbread Village Kit
Good morning! I hope you're looking forward to today's post - I sure am. I have so much to share with you! Today we're introducing the Homespun Holiday: Gingerbread Village Kit (all of the new releases will be available at Noon EDT on Saturday 7/2).

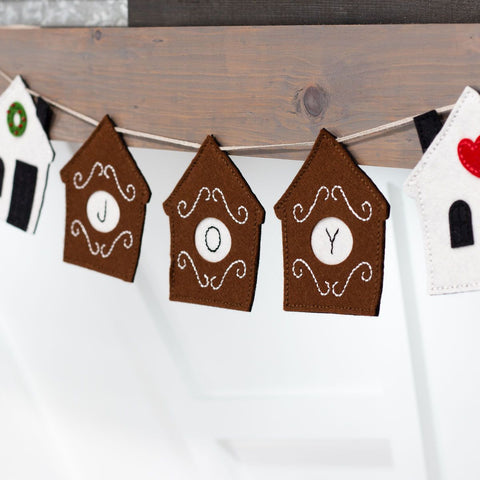
Gingerbread houses are one of the most iconic holiday staples. They are a marvel of confectionery, sure to delight even the most obstinate Scrooge. The Homespun Holiday: Gingerbread Village kit celebrates these cheerful dwellings and all of their sugary sweet design possibilities. The die includes embroidered piping options, an array of architectural details, and charming seasonal accents. There is so much variety you’ll be able to put together a Christmas village filled with entirely unique creations - no royal icing required!

Not only that, but we've reimagined our previous kit size and elements to make these gingerbread houses a real value! You'll still get everything* you need to create these delightful little houses, but we've trimmed it down a bit to keep the cost at just $100!
*die cut machine and fiberfil stuffing not included.
Here is everything that's included in your kit:
- 27-piece die set
- zippered project bag
- 2 all-purpose needles
- handy needle storage tube
- printed inspiration guide for easy reference
- exclusive access to a tips & tricks video
- 5 yards of white crochet thread
- 3 rolls of 5" x 36" felt in Walnut, Gingersnap, and Tundra
- one 5" x 6" panel of Cardinal felt
- one 5” x 6” panel of Arugula felt
- 5 skeins of embroidery floss
- 4 colors of seed beads
- 2 colors of sequins (in two sizes)
- compartmented bead storage container
You'll have plenty of supplies to get creating right away!
I have so many projects to share with you, but so do these creative ladies.


Make sure to check out Kelly's blog post HERE to see what she has to share today!

Check out Koren's blog post HERE to see what she has in store!
How about some projects? These first two projects also incorporate the new Accessory Alphabet. Let's get started!

I created this ornament with the Walnut felt as my base. I centered the door and used the windows with the sash layer option. There is also a shutter option in the kit. I embellished the peak of the roof with a wreath (I used lazy daisy stitches to attach it to the house and give it a leafy appearance) and added a heart to the door for a bit of interest. You might also notice that I went with a "perfectly imperfect" spacing on the wreath with the beads. Could you do it absolutely symmetrically? Sure. But I like things to look a little bit quirky.

On the back of this ornament, I used the "Be Merry" greeting from the Cocoa Messages die to add a bit of fun. I also embellished the scallops of the roof line with individual beads to give a touch of sparkle. To create the pocket, I cut an extra house and trimmed off the top. I used the Accessory Alphabet to personalize that panel before stitching it into place.

The pocket is the perfect place to tuck a gift card, cash, or another small item. I love being able to give something with a gift card so it feels a little more special. Gift cards are so handy, especially for those really hard-to-buy-for folks, but they can feel impersonal. This ornament helps ease that vibe a bit.
The second ornament I have to share is also personalized with the new Accessory Alphabet, but this time I used two people's initials.

But first, on the front I used the same wreath, but here I chose to use it to decorate the front door. I didn't use the "holes only" die for placement, I just held it while I stitched. I also used the "holes only" dies by themselves for the arched and circle windows to give them an embroidered rather than layered look. The scroll is one of the piping designs in the kit. I love how it looks embellished with beads and sequins!

On the back I used oval from the Keepsake Ornaments Extras Die to cut a window and then used the Accessory Alphabet in the opening to add the personalization. There is a small heart in the Gingerbread Village kit, but the one I used here is from the Gingerbread Friends Die (it's just a little bit smaller and fit better with these particular letters). I also embellished the oval scallops with clear beads for sparkle and used the year from the Keepsake Dates Die to commemorate the year. These ornaments would be really cute for a newly married couple or someone who just bought their first house.

The first two ornaments I've shared were filled with regular polyfil, but I've done the next few with quilt batting. I'm not sure if you can see the difference, but I thought this side-by-side might help (quilt batting on the left, polyfil on the right). The quilt batting is much flatter, but it still gives the impression of a stuffed shape. I really love both, but I thought it was worth mentioning the different styles.

This ornament trio all features monograms on the back and regular gingerbread-y goodness on the front.

To begin this little beauty, I started with Gingersnap felt and added the decorative piping design. The door tucks nicely right in the center. Then I used the arched windows, the small heart, and the chimney to round out the design. Aren't the little sequin "garlands" on the windows just the cutest?! I also added a beaded wreath to the door. Typically I use 2-3 strands of thread when I'm stitching, but I used all six strands on most of the white stitching to make it look a little like thicker piping.

On the back, I flanked the Monogram Alphabet letter with candy canes and added a shuttered window with another sequin detail. The die set includes holes only dies for the candy cane facing both directions (but there is only one candy cane, you just flip the die cuts over to use them both ways).

This ornament uses the snowflake design with the layered arched windows. Instead of using a chimney on this one, I opted for the peppermint to decorate the roofline. The snowflake and even the door got a bit of embellishment using the beads and sequins included in the kit.

On the back, I opted to keep things a bit more minimal since this ornament is intended for a male family member. I chose to use the shuttered windows in a side-by-side arrangement under the monogram to keep things nice and simple, but still plenty festive.

This third ornament switches up the orientation a bit. Rather than center the door, I offset it and then used the shuttered window beside it. I used the larger of the two hearts in the die set to decorate the peak of the house. Then I used sequins and beads to embellish the roofline.

On the back, I had a lot of fun with the scroll piping designs and used them to frame the monogram. I used the peppermint to add some whimsical flair and added hints of sparkle with beads and sequins. The contrasting stitch on the monogram really makes it stand out!

I wanted to make a quick note about the peppermint. I usually include holes only dies for everything, but when I was designing this kit I was thinking of it as being something you only attached in the center (using a bead to anchor it) so there is not a "holes only" option for this element. But if you prefer a little more security this sweet little embellishment is also a snap to stitch down along all of the spirals as well. Simply hold or pin it in place while you do your stitches. Easy peasy!
That's all I have to share today, but I'll be back tomorrow morning with one final inspiration post using all of the new products launching at Noon (EDT). But...

*THIS GIVEAWAY IS NOW CLOSED*
In the meantime, it wouldn't be a grand debut without a giveaway! Leave a comment on this blog post telling us about a beloved holiday tradition before 7am EDT on July 2nd and I will randomly select one winner to receive a $50 credit to our store! The winner will be announced on Saturday (7/2) morning's post at 9am. The winner has 30 days to contact Customer Service (customerservice@poshtadesign.com) and claim their prize. Good luck and we'll see you tomorrow for even more inspiration!
Making tamales with the family before Christmas!
My favorite tradition is putting together Shutterfly photocards with photos of our trips each years, stamping on the envelopes (to justify my holiday stamps), and mailing to family and friends who have come to expect them each year. We haven’t seen some of them (even before the pandemic) for years due to distance so it’s a way to stay in touch.
Having my family over for the weekend before Christmas to celebrate together since some of us work Healthcare we can ensure to celebrate together.
Great gingerbread release! My favorite Christmas tradition is decorating cookies and enjoying late night drinks together.
My family holiday tradition is everyone opening one gift on Christmas Eve.