Introducing the All Bundled Up Mitten & Stocking
Good morning, everyone! I've had so much fun reading your responses to the giveaway question each day. Don't forget to comment for your chance to win!
I'm back for our third day of Holiday 2022 introductions and today is packed with projects! Let's take a closer look at the new products!

Keep your hands cozy in style with the All Bundled Up Mitten Die (retails for $38). This mitten comes with a handsome argyle design, ribbed cuff, and more! And the best part? No need to take down your decorations by the New Year! These mittens make darling home decor that will last all winter long. The All Bundled Up Mitten Die includes an Inspiration Guide for handy reference.

This year, why not hang handmade, personalized stockings by the chimney with care? The All Bundled Up Stocking Die (retails for $50) includes stripes, contrasting cuffs, and a layered snowflake motif that you can use to create precious mini stockings for everyone on your list. These stockings are even perfectly sized to hold a gift card or other tiny trinkets. You’ll love playing with all the possibilities and your loved ones will have special keepsakes made just for them. Everybody wins! The All Bundled Up Stocking Die includes an Inspiration Guide for handy reference.
Let's see what the Guest Creators have done with these fantastic new dies!


How cute are these mittens?! Connecting them with a length of chunky yarn gives such nostalgic, childhood vibes. They really are so sweet! See more of Chari's projects on her blog HERE.


I love making gift cards feel a little more special and this embroidered stocking gift card holder from Dana is sure to make someone very happy! See more of her projects for today HERE.


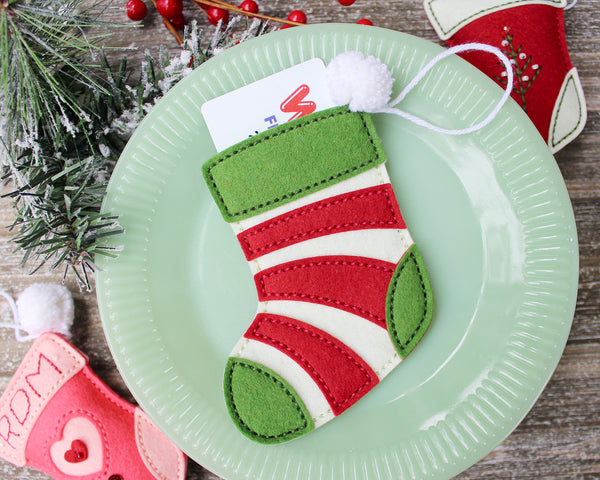
How stinkin' cute are these holiday table place settings?! Shara is just so, so clever! See more of her project HERE.
I'm so excited to get to my projects today, so let's jump in starting with the All Bundled Up Mitten Die!

Do you remember the filigree egg wall hanging that I made this spring? Well, I thought I might recreate it with the mittens! By the way, I apologize for the distracting painter's tape/cardboard/bubble wrap chaos happening on the stairs. I probably should have found a better place to take photos.

I chose to focus on the argyle design to keep things nice and clean. Too many designs could get busy, so I stuck with one layout and switched up the colors on each mitten to keep things interesting. I used the Rustic Cabin Color Story for this project.

On the back of the top mitten, I embroidered the year using the Keepsake Dates Die. I love that years from now, I'll be able to look back and know exactly when I made each piece of decor.

I embellished the front of each mitten first, and then simply sewed the hemp ribbon right between the layers of felt to secure each one in place.

The Weathered Moss and Indigo mittens also incorporate the ribbed cuff design. I stitched and tied off each row separately to make sure I'd have nice, clean lines. The ribbed detail die can be used on both the cuff and the body of the mitten, so I was able to line everything up easily and just sewed through all three layers (one cuff, two mittens) at the same time.
I love it and can't wait to use it this year!
I also wanted to make some ornaments for our niece and nephew. Since they're siblings, I wanted them to coordinate, but not be too matchy (I used the Holly Hill Color Story for these). I sewed each mitten cuff flat, but then stuffed the "hand" areas. I used the same embroidered medallion on both.

That's right, you can sew two different patterns using the same die! The two patterns are clearly printed on the included Inspiration Guide for handy reference.

On Josie's ornament, I went with a flower design. The small circle is also included in the All Bundled Up Mitten Die.

On Charlie's ornament, I created a snowflake design. I love how perfectly the beads fit into the "V" shapes in this design.

On the opposite side, I used the chevron trio embroidery design to showcase their respective monograms. I think they'll really like them. If there's one thing I've come to realize, kids in particular are pumped about personalized items. It shows they were made just for them and who doesn't like to feel special, particularly at the holidays?
Next up, let's take a look at the All Bundled Up Stocking Die!

This first trio of ornaments were created with the Rustic Cabin Color Story. I created stockings facing both directions by simply flipping over my die cuts and sewing the "wrong" side out (that's the case with the striped and leaf medallion stockings). Because the felt is so forgiving, you can use the dies both directions (this works best with felt).

The leaf medallion is actually from this year's holiday kit. You'll see more of that tomorrow, but here's a little sneak peek. This reminds me of mistletoe and I love it! I stuffed this ornament with quilt batting and cardstock (two layers of batting on either side of a cardstock insert) rather than polyfil to give it a slimmer appearance.

The striped design makes me downright giddy. And I'm all about those contrasting heels, toes, and cuffs! This ornament was stuffed with polyfil for a softer look.

On the back, I added the year to the cuff using the Keepsake Dates Die.

The Nordic snowflake design is so cute! I do want to note though that the narrow areas on the snowflake are fairly delicate, especially before the layer is attached. If you're concerned with sturdiness, I would suggest ironing on a bit of stabilizer to the back of your felt before die cutting. Mine have been fine, but I can imagine a certain 2-year-old that could change that if she really wanted to.

This next set is done in the Holly Hill Color Story. I just love these colors together!

The striped stocking is actually a gift card holder. To do this simply stitch across the top front and the top back pieces (cuff and stocking layer together) before stitching all the pieces together down the sides. This creates a pocket that you can fill with gift cards, treats, whatever you like! I also add a pom-pom to this stocking because everyone loves a pom-pom and it adds a fun fluffy texture. I just went ahead and used the same yarn for the hanger.

I adore this embroidered tree element for when I want something a little simpler and quicker than some of the more involved designs. The seed beads are great for adding "ornaments." I used polyfil to stuff this ornament so it's nice and puffy.

The final ornament I have to share today is another personalized design. I used the Accessory Alphabet to add the initials to my stocking cuff. I would imagine you could fit as many as four letters comfortably on the cuff. Another pom-pom is a must for the special little girl this ornament is destined for later this year. The hearts are actually part of the kit that you'll see tomorrow, but I love that so many of the elements are interchangeable.
I hope you've enjoyed today's closer look at the All Bundled Up Mitten and Stocking dies! I'll see you back here again for the full reveal of this year's holiday kit!

THIS GIVEAWAY IS NOW CLOSED:
In the meantime, it wouldn't be a grand debut without a giveaway! Leave a comment on this blog post letting us know
"What are your favorite stocking stuffers?"
before 7am EDT on Friday (9/30) and I will randomly select one winner to receive a $50 credit to our store! The winner will be announced on Saturday (10/1) morning's post at 9am. The winner has 30 days to contact Customer Service (customerservice@poshtadesign.com) and claim their prize. Good luck and we'll see you tomorrow for even more inspiration!

I love these new dies. Need to stuff stockings with chapsticks, candy canes, and whatever else can be stuffed.
Candy and little Knick-knack toys (just have to remember to take candy out if it’s chocolate so it doesn’t melt!!)
I can’t stuff a stocking without a candy cane!
Candy!!!
I love to give my kiddos bomba socks every year and those stockings make great stuffing for other stockings!