Egg Hunt Color Story Inspiration With More of the Egg Details Collection
Good morning, friends! Today is release day and we couldn't be more excited. We can't wait to see how you use these wonderful new products to create holiday magic for your own loved ones. In the meantime, I have a little more inspiration to share. But first, let's announce the winners of our $50 giveaways!

First from Day 1 we have Sharon Gullikson at 6:26pm.

The on Day 2 we have Maria CF at 3:03pm

Congratulations to our winners and thank you all so much for commenting and giving your feedback! Winners, please contact Customer Service (customerservice@poshtadesign.com) within 30 days to claim your prizes.
Now let's get on to a few more projects, shall we? I wanted to make sure I showed my Egg Hunt creations before the release. This is such a fun Color Story and I am thrilled to hear so many of you love it just as much as I do.

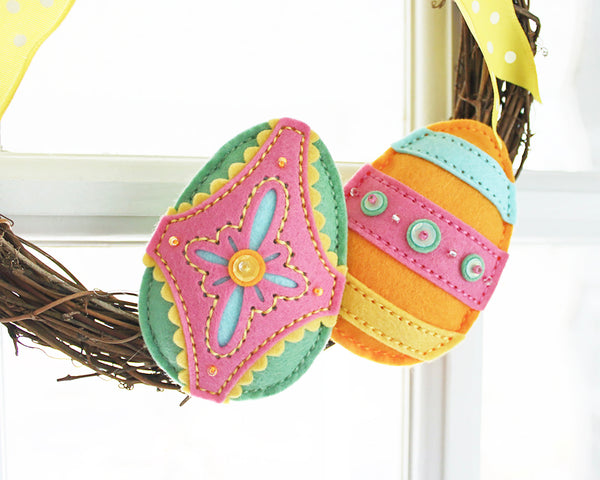
First up, how about a wreath. I'm a sucker for a great, seasonal wreath so I knew right away I wanted to make one with these happy little eggs. I used a 10" grapevine wreath and it felt like a great size for two eggs. And the ribbon is a yellow polka dot that I found at my local JoAnn store, in case anyone is curious.
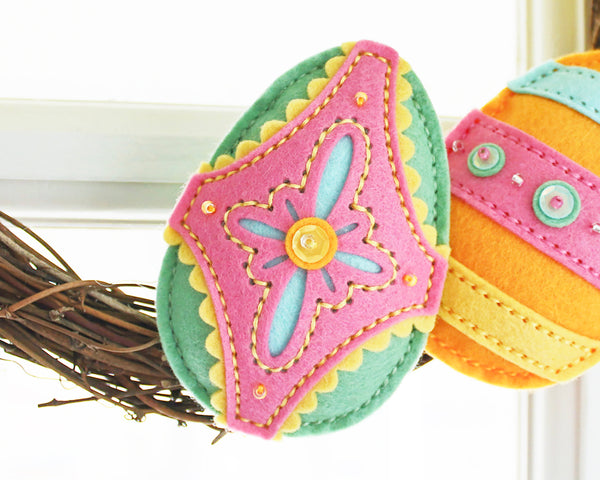
I did one Filigree egg and I used all the layers to make it feel extra fancy. I wanted to get as many colors in there as possible, so using all the elements felt like the perfect way to do that. I also used some beads from the Color Story embellishment kit to incorporate another little pop of orange around the center medallion.

I also used extra bits and bobs to add more interest to the Stripe egg. The small Soft Jade circles layered under the sequins are actually the smallest dot from the Polka Dot die while the larger center circle is the layering circle from the Filigree set.
I actually hot glued the eggs to the wreath to finish things up. I don't think there's anything wrong with mixing stitching and hot glue, especially for a project like this. Could you stitch the eggs to the wreath? Probably. Do I want to? No. Definitely not.

I also wanted to use the Egg Hunt Color Story to create some sweet monogrammed ornaments. I've seen more and more Easter ornament trees in recent years and I am fully on board. Another reason to have a fake tree covered in colorful stuff in my house? Yes, please!

Here you can get a better look at the Egg Window Detail Die that I mentioned the other day. I am so, so, so in love with this die. Imagine all of the things you can do with it! layer it over a calico fabric, layer it over the Embroidered Egg Detail pattern, make cards and tags with patterned papers. Ack! I have more ideas than time, you know?

I love that the scallops can be embellished with beads and sequins or be left alone to just be adorable scalloped edges. I also really love the look of contrasting stitches around the window. It's such a fun way to bring in more color.

As you may have figured out, I did a monogram for each of my immediate family members to keep on our little tree. I used the Monogram Alphabet and Inline Monogram Alphabet dies to make the placement a snap.

I also added the year to the back of each of these with the Keepsake Dates die. You'd better believe that I'll be making new ornaments every year, so having the dates on them gives me a little bit of a hand when I'm trying to remember when they were created. Plus, it takes no time at all and it's cute in a contrasting thread color!

I also wanted to try a different style of 3D ornament with these dies. I figured stuffing four eggs together would turn out looking more like a softball (can confirm), but I wondered what would happen if I used a stiff insert instead. Turns out it looks like this!

I used different colors on each of the sides and I alternated between Polka Dot and Striped sides.

To do this I sewed up three of the four sides and then tucked in a chipboard insert to give it some rigidity (the one in the photo is cardstock, but I'd suggest thin chipboard if you have some). I simply cut two egg shapes with the die, trimmed off the holes, and cut one halfway up from the bottom and the other halfway down from the top. Then I slid the two cuts together to make an "X" shape.

Once it was inside I just sewed up the final edge. I chose to use a blanket stitch on this ornament, but you could also use a running stitch with very similar results, I just thought it would be fun to switch it up with an alternate stitch.

It's such a cheerful ornament and it's so fun to spin! Not only that, but it's an unexpected shape which adds such a nice contrast to the group. I definitely want to make another one!
Thank you so much for joining me over the past few days! I hope you've enjoyed yourselves and are excited about the release today (3/12) at Noon EST. Happy crafting and I'll see you again very soon!
Will the embroidered egg detail sold out die come back in stock soon??
This collection is just indescribable!! My order is placed, and will be literally pounced upon when it arrives! 😉 Thank you for all the effort you put into your designs. Happy Easter!!
Gorgeous!
Such lovely decorations ideas!
More INCREDIBLE looks!! The 4-sided eggs are such a great idea. I am really excited to make some of these with my grandkids. They love to make crafts, and these would be a lasting decoration they can display year after year. And the Egg Window Detail is just perfect for a frame around any number of focal points. Your designs are just incredible. I haven’t been this excited about a new crafting product since I don’t know when….