Dip Dyed Color Story Inspiration Using the Egg Details Collection
Good morning, friends and welcome back for a second day of inspiration featuring the Egg Details. Today I'm working with the Dip Dyed Color Story, but first, I have a very special guest to introduce!

I hope you'll give Dana Joy a warm welcome today.

You likely are already acquainted with Dana and her amazing work, but let me tell you what draws me to her creations. She embraces bold textures and techniques in her projects in a way that I find totally inspiring. She also has a knack for effortlessly and adeptly pulling off color schemes that I wouldn't have the confidence to try. And her work with Pocono Pam and Hero Arts to create the Unity Collection brought about a much needed conversation that has helped the creative community grow and change in such essential ways. She's truly a talented lady and I am genuinely thrilled to have her joining in with this season's release.

Please make sure to head over to her blog to see the cards she is sharing with the Egg Hunt Color Story. Don't forget to leave her a little love while you're there!
As I mentioned earlier, I'm working with the Dip Dyed Color Story today.
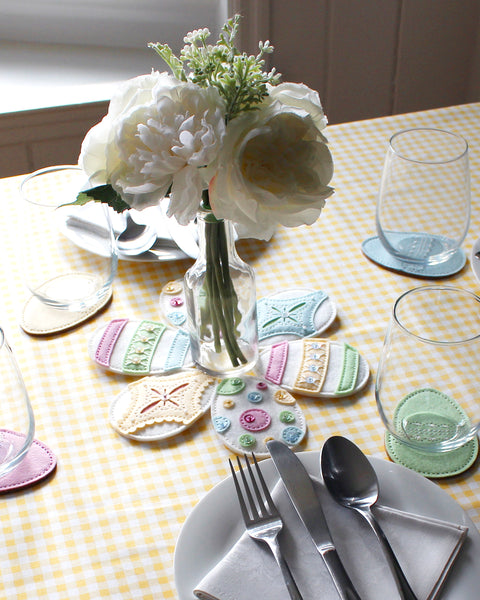
I wanted to create something that could be used to decorate an Easter brunch table.

I love a pretty centerpiece, so I decided to see if I could create a sort of "penny mat" but with eggs instead of circles.

I used the Tundra felt as the base for all of my eggs and added the color in the layers and details.

I cut a full pass of all of the polka dots in each of the colors, so I have enough extra pieces that I could do two more whole eggs. Having all of the dots available really makes it much easier and quicker than having just one of each size and shape.

The stripes and polka dots seemed like they could use a little extra sparkle (this centerpiece is for brunch after all!) so I embellished with sequins and beads for some added interest.
The Filigree eggs are only one layer thick because I wanted to keep the bulk at a minimum, but I used both layer styles to add variety.

To connect the eggs, I simply stitched a few stitches through the layers on the back (you can barely even see it because the stitches go between the layers of felt). I also added a piece of cardstock between the layers of the egg just to give the centerpiece a little extra stability. I simply cut with the Basic Egg Die and then trimmed off the holes to have a perfectly shaped insert. And it doesn't even have to be all that perfect because no one will ever see it. Wouldn't that sweet centerpiece be egg-cellent for decorating your holiday table? Ba-dum-ching!

A pretty brunch table wouldn't be the same without some festive-yet-sophisticated coasters. Wouldn't want those mimosas to leave a ring, amiright?!

I used the Embroidered Egg Details Die to add the band to each egg and then stitched simply with white embroidery thread (the stitching is only on the felt layer, not on the cork underneath). I think the result looks clean and classic.

The cork backing for these coasters is self-adhesive cork from Contact Paper. It's about 1/16" thick, so I went with two layers, attaching the sticky sides to each other. If you were to try this and find you have tacky edges, you can lightly brush the edges with your embossing powder tool (not the actual embossing powder) or cornstarch to remove the adhesive. I didn't have any problems though.
I hope you've enjoyed today's post! I'll be back tomorrow with a few projects in the Egg Hunt Color Story, but until then you know what time it is?

It's time for a giveaway! Leave a comment on this blog post letting us know what you think of the new lineup before 7am EST on March 12th and I will randomly select one winner to receive a $50 credit to our store! The winner will be announced on Saturday (3/12) morning's post at 9am. The winner has 30 days to contact Customer Service (customerservice@poshtadesign.com) and claim their prize. Good luck and we'll see you tomorrow for even more inspiration!
*The giveaway is now closed and winners will be announced at 9am on a Release Day blog post.*
So happy to see the new seasonal offering! The centerpiece project looks so nice, especially in this color story.
These are the prettiest pastels! And your designs are simply perfect. I’m in love with everything!! 🥰
As my dad used to say to my mother after every “special” meal, “(Irene), you’ve hit a new high!
Love your creations! Excited for the release tomorrow!!!
Your ideas are so great, and the projects are beautiful!